0. 博客需求
- 免费
- 支持代码高亮
- 支持文章分类
- 支持markdown
- 支持LaTex
- 必要的统计信息
- 方便个性化定制博客
- 可绑定域名
- ……
1. 准备工作
本教程使用的是MacOS,Windows下个别操作方法可能有些不同,请自行查询。
1.1 安装git
XCode自带git,如果没有的话去git官网 https://git-scm.com/ 进行安装。
使用git --version命令查看git是否安装成功。
使用阿里云镜像进行加速:
npm config set registry https://registry.npm.taobao.org1.2 创建博客的github仓库
新建一个github仓库:
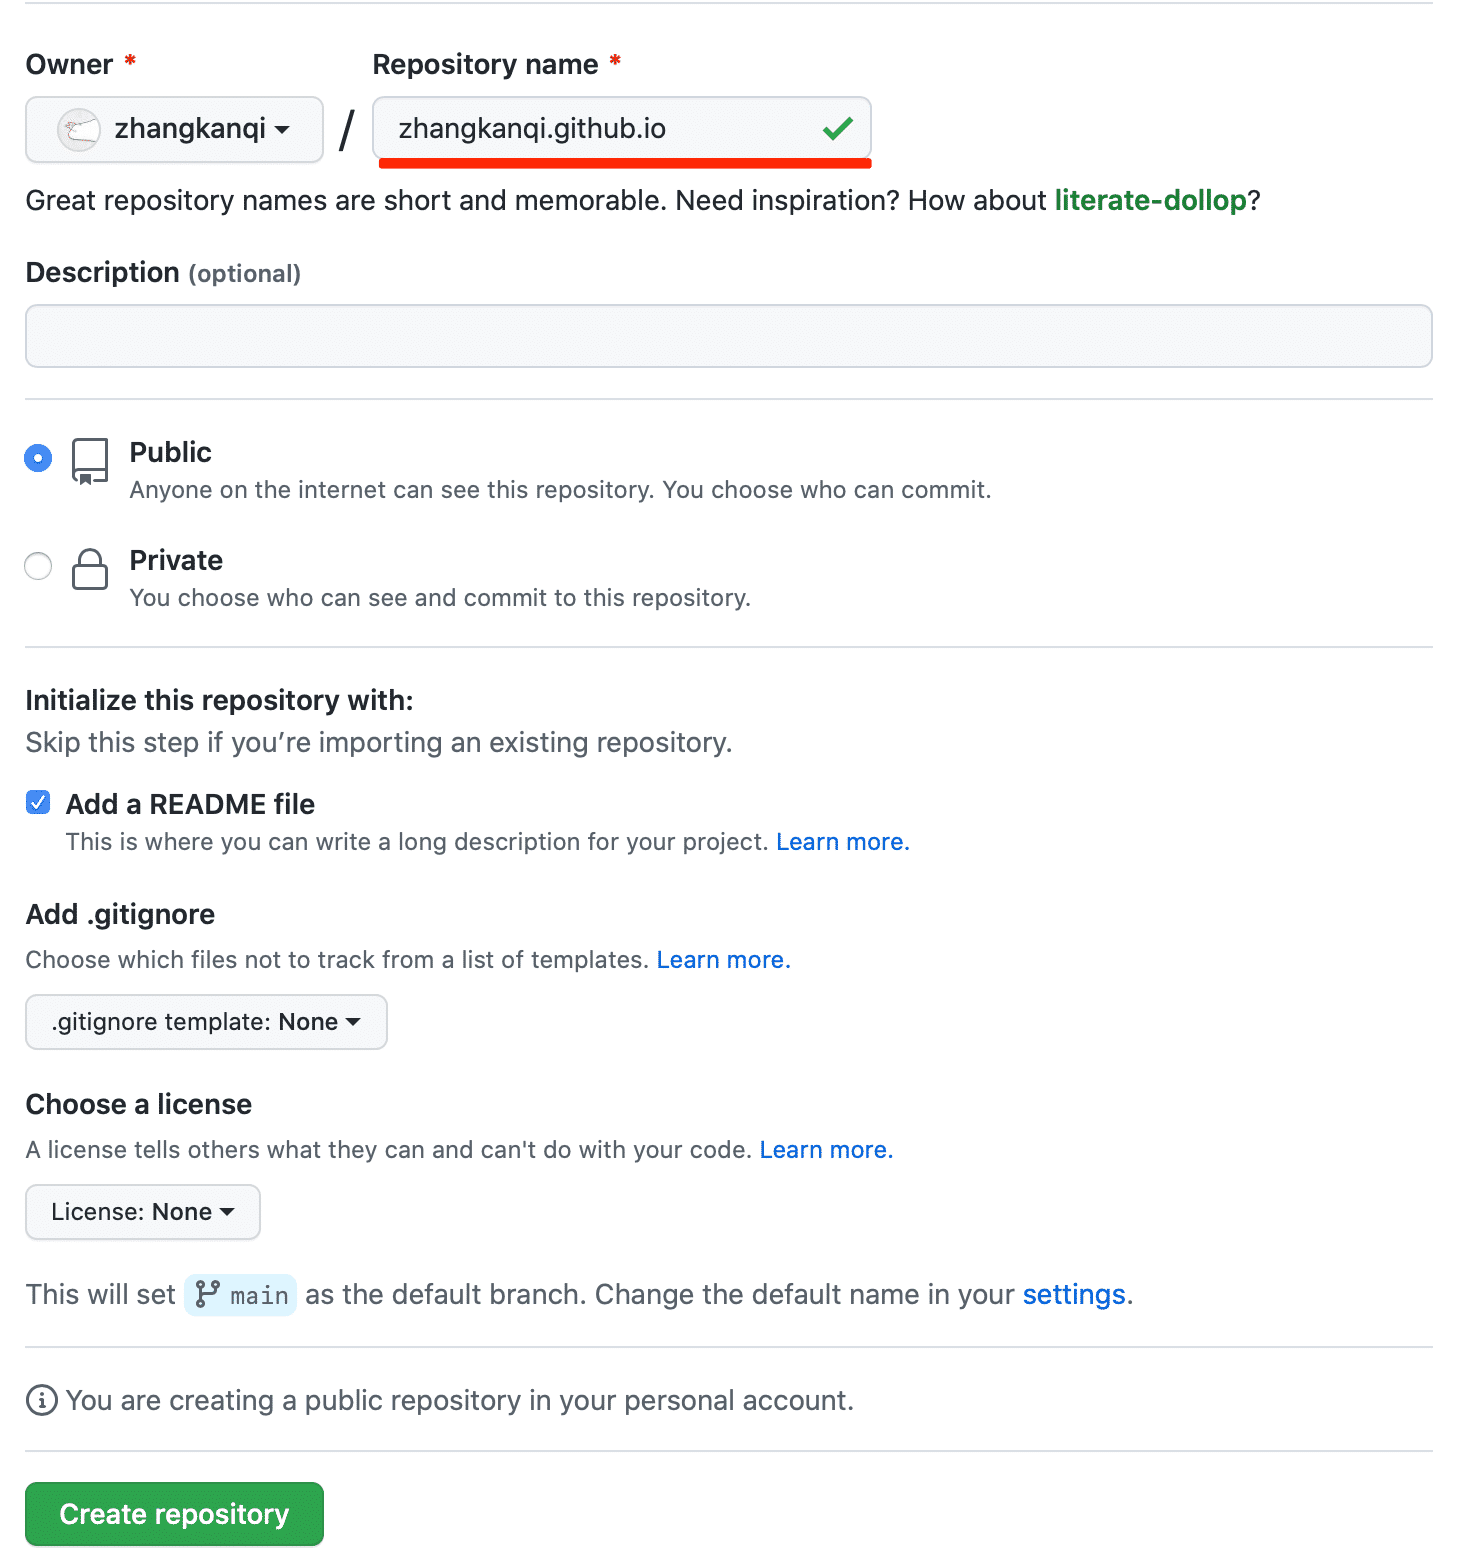
选择一个theme,然后访问https://zhangkanqi.github.io/即可看到主题的效果。

1.3 安装Node.js
从官网 https://nodejs.org/en/download/ 下载并安装符合自己所用操作系统的Node.js。
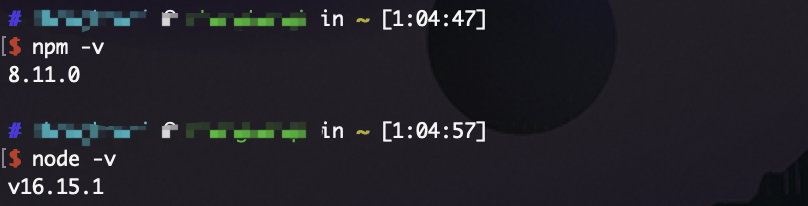
下载完后运行以npm -v和node -v命令检查是否安装成功:
出现版本信息说明安装成功,如下图。
1.4 安装Hexo
在个人pc合适的位置上创建一个文件夹,如~/myblog,用来存放自己的博客文件。
cd ~/myblog

# 安装hexo
sudo npm i hexo-cli -g

# 检查是否已成功安装hexo
hexo -v

# 初始化存博客文件的文件夹
hexo -init

# 安装搭建博客必备的组件和扩展
npm install
npm i hexo-deployer-git

# 生成静态网页,也可以写成hexo generate
hexo g

# 打开本地服务器,也可以写成hexo  server
# 命令执行后用浏览器打开http://localhost:4000/,可以看到默认的hexo的网页
# ctrl+C关闭本地服务器
hexo s
1.5 连接github与本地
先在本地进行一下操作:
# git config --list
git config --global user.name "github用户名称"
git config --global user.email "github的注册邮箱"

# 生成密钥SSH key(一路回车即可)
ssh-keygen -t rsa -C "github的注册邮箱"

# 查看生成的SSH key
cat ~/.ssh/id_rsa.pub
然后在GitHub的用户settings->SSH and GPG keys中新增一个SSH key,Title随意,将~/.ssh/id_rsa.pub的内容填入Key一栏。
在本地输入以下命令检查是否成功与GitHub连接:
ssh -T git@github.com输出用户名就表示成功与GitHub连接。

修改博客配置文件:
cd ~/myblog
vim _config.yml
将_config.yml的文件末尾加入自己的GitHub仓库地址,修改成如下:
deploy:
  type: git
  repository: https://github.com/zhangkanqi/zhangkanqi.github.io
  branch: main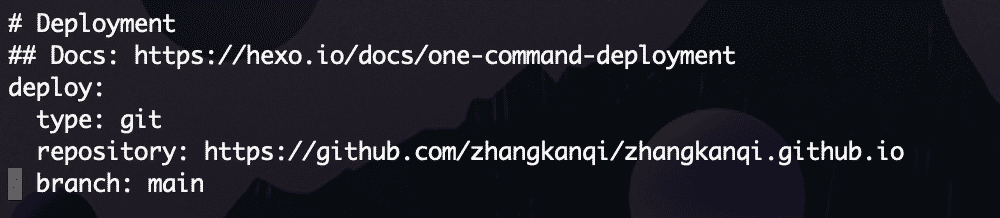
1.6 本地博客文件备份
先在GitHub的博客仓库中新建local分支,用于存储本地的博客文件。然后执行以下操作:
cd ~
git clone https://github.com/zhangkanqi/zhangkanqi.github.io.git
cd zhangkanqi.github.io
cp -r .git ~/myblog
cd ~/myblog
git branch local
git checkout local
# 取消掉
vim .gitignore
注释掉需要提交的文件:
.DS_Store
# Thumbs.db
# db.json
*.log
# node_modules/
# public/
.deploy*/
_multiconfig.yml
然后执行:
git add .
git commit -m '上传本地博客文件'
git push origin local
1.7 绑定域名
在xx云等平台购买一个域名,并在该云平台的控制台添加域名解析记录:

在GitHub仓库的settings->Pages绑定域名:

稍等几分钟,然后访问http://www.zhangkanqi.com,正常显示页面则表示已成功绑定域名。
【update】:
在GitHub仓库的settings->Pages绑定的域名,每次hexo d的时候该域名绑定信息会被清空,每次都需要重新绑定域名。
解法方法:
cd ~/myblog/public
vim CNAME在CNAME写入自己的域名即可,如www.zhangkanqi.com。
1.8 发布文章流程
cd ~/myblog

# 新建一篇文章,标题是second title
hexo new post "second title"

# g即generate
hexo g

# s即server,访问http://localhost:4000/在本地查看网页效果
hexo s

# d即deploy,更新文件到GitHub仓库
# 先去GitHub用户settings->Developer settings->Personal access tokens中generate new token,复制token,将该token粘贴到hexo d需要输入密码的地方
hexo d最后,访问https://www.zhangkanqi.com即可看到网页信息,如下图所示:

2. 博客主题-matery
2.1 更换主题
选择一个自己喜欢的hexo主题,我使用的是https://github.com/blinkfox/hexo-theme-matery。
cd ~/myblog/themes
git clone https://github.com/blinkfox/hexo-theme-matery.git
cd ~/myblog
vim _config.yml
做如下修改:
# site
language: zh-CN
author: kkqq

# URL
url: http://www.zhangkanqi.com

# Home page setting
  per_page: 6

# Pagination
per_page: 6

# Extensions
theme: hexo-theme-matery
2.2 新建必要的页面
2.2.1 分类页面
hexo new page "categories"
vim ~/myblog/source/categories/index.md
对source/categories/index.md做类似的如下修改:
---
title: categories
date: 2018-09-30 17:25:30
type: "categories"
layout: "categories"
---
2.2.2 标签页面
hexo new page "tags"
vim ~/myblog//source/tags/index.md
对source/tags/index.md做类似的如下修改:
---
title: tags
date: 2018-09-10 18:23:38
type: "tags"
layout: "tags"
---
2.2.3 关于页面
hexo new page "about"
vim ~/myblog/source/about/index.md
对source/about/index.md做类似的如下修改:
---
title: about
date: 2018-09-30 17:25:30
type: "about"
layout: "about"
---
2.2.4 留言板页面
hexo new page "contact"
vim ~/myblog/source/contact/index.md
对source/contact/index.md做类似的如下修改:
---
title: contact
date: 2018-09-30 17:25:30
type: "contact"
layout: "contact"
---
需要修改主题里的_config.yml的19-21行(暂不实现)。
2.2.5 友情链接页面
hexo new page "friends"
vim ~/myblog/source/friends/index.md
对source/friends/index.md做类似的如下修改:
---
title: friends
date: 2018-12-12 21:25:30
type: "friends"
layout: "friends"
---
然后修改对应的friends.json文件:
cd ~/myblog/source
mkdir _data
cd _data
vim friends.json
在friends.json中插入如下类似信息:
[{
    "avatar": "http://image.luokangyuan.com/1_qq_27922023.jpg",
    "name": "MaJang",
    "introduction": "I am not a master, just looking for the master's footsteps.",
    "url": "http://luokangyuan.com/",
    "title": "Read More"
}, {
    "avatar": "http://image.luokangyuan.com/4027734.jpeg",
    "name": "Blinkfox",
    "introduction": "Hello, I'm blinkfox, I like programming.",
    "url": "https://blinkfox.github.io/",
    "title": "Visit Blog"
}, ]
2.2.6 404页面
hexo new page 404
vim ~/myblog/source/404/index.md
对source/404/index.md做类似的如下修改:
---
title: 404
date: 2020-05-30 00:00:00
type: "404"
layout: "404"
description: "Cannot find the page you want :("
---
3. 个性化博客
3.1 修改主题的_config.yml
本小节里的操作针对~/myblog/themes/hexo-theme-matery/_config.yml进行修改!
此小节仅记录了部分修改过程,其他自定义内容具体请见hexo-theme-matery/_config.yml
3.1.1 导航菜单
icon可参考https://fontawesome.com/icons
cd ~/myblog/themes/hexo-theme-matery
vim _config.yml
在menu中,一级菜单写法如下:
Friends:
  url: /friends
  icon: fas fa-address-book
二级菜单写法如下:
Medias:
   icon: fas fa-list
   children:
     - name: Musics
       url: /musics
       icon: fas fa-music
     - name: Movies
       url: /movies
       icon: fas fa-film
3.1.2 文章字数统计
# 安装hexo插件,支持在文章中显示文章字数、阅读时长信息
npm i --save hexo-wordcount
cd ~/myblog/themes/hexo-theme-matery
vim _config.yml
在博客主题中激活相关配置:
postInfo:
  date: true # 发布日期
  update: false # 更新日期
  wordCount: true # 文章字数统计
  totalCount: true # 站点总文章字数
  min2read: true # 文章阅读时长
  readCount: true # 文章阅读次数
3.2.3 修改页脚
页脚文件在~/myblog/themes/hexo-theme-matery/layout/_partial/footer.ejs
若要显示正常的网站运行时间,需要在主题的_config.yml中设置类似的如下配置,激活并设置网站开始运行时间:
cd ~/myblog/themes/hexo-theme-matery
vim _config.yml
在主题的_config.yml中填入如下类似的内容:
time:
  enable: true
  year: 2022 # 年份
  month: 07 # 月份
  date: 25 # 日期
  hour: 00 # 小时
  minute: 00 # 分钟
  second: 00 # 秒
3.2.4 修改社交链接
社交连接文件在~/myblog/themes/hexo-theme-matery/layout/_partial/social-link.ejs
cd ~/myblog/themes/hexo-theme-matery
vim _config.yml
在博客主题的_config.yml中修改相关配置:
socialLink:
  github:  https://github.com/zhangkanqi
  email: zhangkanqi@foxmail.com
  facebook: # https://www.facebook.com/xxx
  twitter:  https://twitter.com/cutekkqq
  qq:
  weibo:
  zhihu: https://www.zhihu.com/people/xi-fu-hai-tang-38
  rss: true # true、false
3.2.5 音乐播放器
cd ~/myblog/themes/hexo-theme-matery
vim _config.yml
在博客主题的_config.yml中修改music相关配置,暂时还有问题,不过我不需要这个功能。
3.2 修改博客的_config.yml
3.2.1 代码高亮
npm uninstall hexo-prism-plugin
cd ~/myblog
vim _config.yml
对博客的_config.yml做以下两处修改:
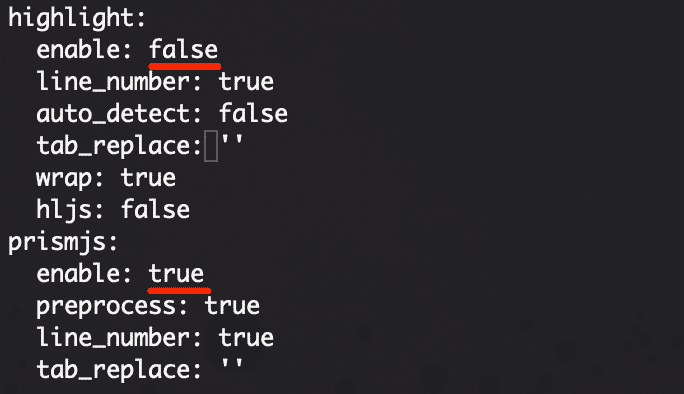
hexo-theme-matery主题中使用的prismjs主题是Tomorrow Night,但是我个人更喜欢okaidia代码高亮主题。
在https://prismjs.com/download.html选择以下要安装的内容:

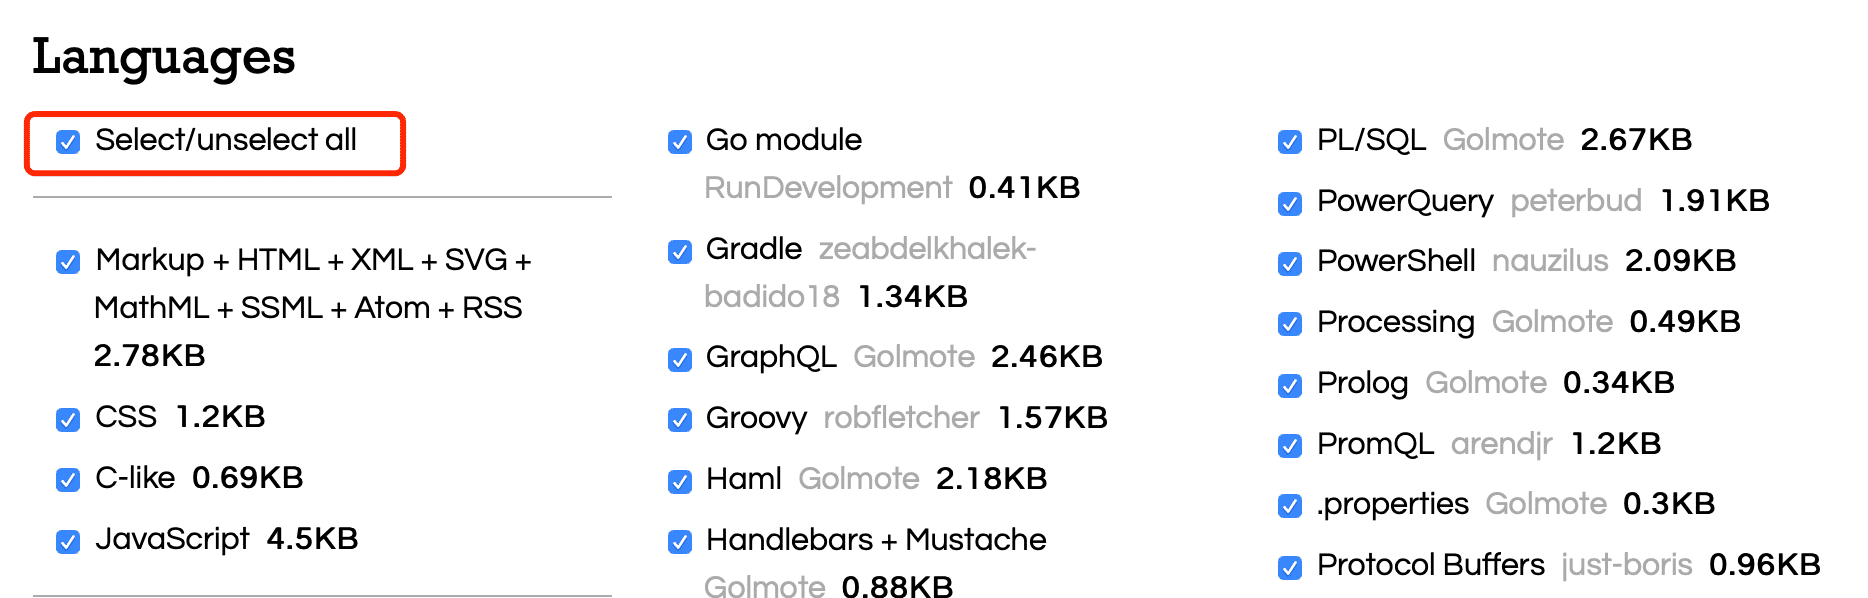
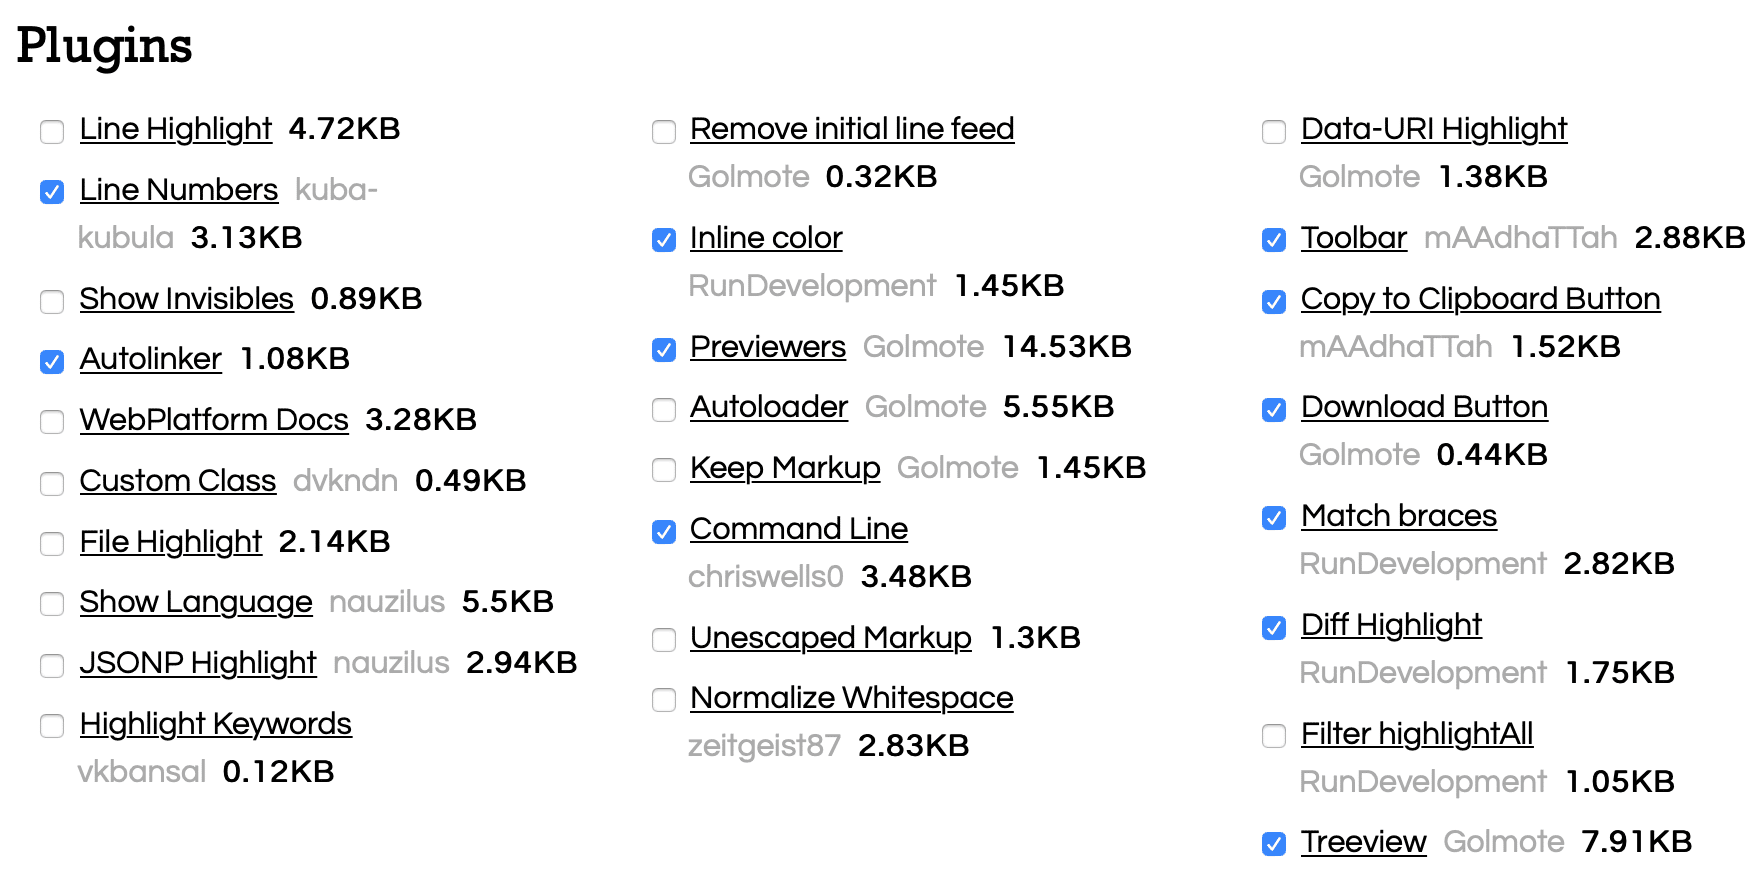
然后点击网页最下方的DOWNLOAD CSS,使用下载好的prism.css文件替换掉~/myblog/themes/hexo-theme-matery/source/libs/prismprism.css。
3.2.2 全站搜索
# 安装hexo的搜索插件
npm install hexo-generator-search --save
cd ~/myblog
vim _config.yml
在博客_config.yml中新增以下内容:
search:
  path: search.xml
  field: post
3.2.3 中文链接转拼音
# 安装Hexo插件,使在生成文章时生成中文拼音的永久链接,有利于SEO和支持gitment评论
npm i hexo-permalink-pinyin --save
cd ~/myblog
vim _config.yml
在博客_config.yml中新增以下内容:
permalink_pinyin:
  enable: true
  separator: '-' # default: '-'
3.2.4 emoji表情
支持把对应的markdown emoji语法(::,例如::smile:)转变成会跳跃的emoji表情。
npm install hexo-filter-github-emojis --save
cd ~/myblog
vim _config.yml
在博客_config.yml中新增以下内容:
githubEmojis:
  enable: true
  className: github-emoji
  inject: true
  styles:
  customEmojis:
然后执行即可将markdown emoji语法转换为对应的emoji:
hexo clean && hexo g && hexo s3.2.5 RSS订阅
npm install hexo-generator-feed --save
cd ~/myblog
vim _config.yml
在博客_config.yml中新增以下内容:
feed:
  type: atom
  path: atom.xml
  limit: 20
  hub:
  content:
  content_limit: 140
  content_limit_delim: ' '
  order_by: -date
重新生成博客文件,然后在 public 文件夹中即可看到 atom.xml 文件,则说明已经安装成功了。
hexo clean && hexo g && hexo s3.2.6 优化文章URL路径
使用hexo编译的站点打开文章的url是:sitename/year/mounth/day/title四层的结构,这样的url结构很不利于seo,爬虫就会经常爬不到我们的文章。
可以将url直接改成sitename/title的形式,并且title最好是用英文。
cd ~/myblog
vim _config.yml
对博客的_config.yml做如下修改:
# permalink: :year/:month/:day/:title/
permalink: :title/
3.3 其他修改
3.3.1 小点总结
cd ~/myblog/themes/hexo-theme-matery/source网站图标:favicon.png
个人头像:medias/avatar.jpg
博客logo(显示在博客网页最上方的左上角处):medias/logo.png
文章封面图集:medias/featureimages
首页封面背景图集:medias/banner
微信/支付宝打赏码:medias/reward
背景图等样式:~/myblog/themes/hexo-theme-matery/source/css/matery.css
博客最上方和最下方栏:~/myblog/themes/hexo-theme-matery/source/css/matery.css中的bg-color
恢复封面和文章特征图原样:~/myblog/themes/hexo-theme-matery/source/css/matery.css的bg-cover修改为:
.bg-cover:after {
    -webkit-animation: rainbow 0s infinite;
    animation: rainbow 0s infinite;
}
3.3.2 在文章中插入音乐
音乐软件web版,点击”生成外链播放器”:

复制HTML代码,插入markdown文件即可。

3.3.3 评论
3.3.3.1 云评论(弃)
在云评论网站http://changyan.kuaizhan.com注册一个账号,进入后台,填入一些必要的信息:

复制安装代码:

然后将安装代码粘贴到主题的post.ejs末尾:
cd ~/myblog/themes/hexo-theme-matery/layout
vim post.ejs
3.3.3.2 git talk
参考教程:https://blog.csdn.net/zy13651953784/article/details/104813021
3.3.4 本地图片加水印
cd ~/myblog
vim watermark.py
将以下内容写入watermark.py,注意要根据自己的水印长度确定水印该放置的位置:
# -*- coding: utf-8 -*-
import sys
import glob
from PIL import Image
from PIL import ImageDraw
from PIL import ImageFont


def watermark(post_name):
    if post_name == 'all':
        post_name = '*'
    dir_name = '/Users/zhangkanqi/myblog/public/articleImages/' + post_name + '/*'
    for files in glob.glob(dir_name):
        im = Image.open(files)
        if len(im.getbands()) < 3:
            im = im.convert('RGB')
            print(files)
        font = ImageFont.truetype('STSong.ttf',  int(im.size[1] / 20))
        draw = ImageDraw.Draw(im)
        mywatermask = '@kkqq'
        draw.text((im.size[0]-font.size*0.6*len(mywatermask), im.size[1]-font.size*1.5),
                  mywatermask, fill=(255, 255, 255), font=font)
        im.save(files)


if __name__ == '__main__':
    if len(sys.argv) == 2:
        watermark(sys.argv[1])
    else:
        print('[usage] <input>')
下载字体STSong.ttf,并将其放在~/myblog下面。
在hexo d将博客文件上传到github之前给图片加水印,注意图片存放的地址以及postname实际应该填什么,要和代码对应:
python3 watermark.py postname3.3.5 不同类型的提示块
源码:https://github.com/lxl80/hexo-admonition
npm install hexo-admonition --save
cd ~/myblog/themes/hexo-theme-matery/source/css
vim my.css
将以下内容粘贴到my.css中:
.admonition {
  margin: 1.5625em 0;
  padding: .6rem;
  overflow: hidden;
  font-size: .64rem;
  page-break-inside: avoid;
  border-left: .3rem solid #42b983;
  border-radius: .3rem;
  box-shadow: 0 0.1rem 0.4rem rgba(0,0,0,.05), 0 0 0.05rem rgba(0,0,0,.1);
  background-color: #fafafa;
}

p.admonition-title {
  position: relative;
  margin: -.6rem -.6rem .8em -.6rem !important;
  padding: .4rem .6rem .4rem 2.5rem;
  font-weight: 700;
  background-color:rgba(66, 185, 131, .1);
}

.admonition-title::before {
  position: absolute;
  top: .9rem;
  left: 1rem;
  width: 12px;
  height: 12px;
  background-color: #42b983;
  border-radius: 50%;
  content: ' ';
}

.info>.admonition-title, .todo>.admonition-title {
  background-color: rgba(0,184,212,.1);
}

.warning>.admonition-title, .attention>.admonition-title, .caution>.admonition-title {
  background-color: rgba(255,145,0,.1);
}

.failure>.admonition-title, .missing>.admonition-title, .fail>.admonition-title, .error>.admonition-title {
  background-color: rgba(255,82,82,.1);
}

.admonition.info, .admonition.todo {
  border-color: #00b8d4;
}

.admonition.warning, .admonition.attention, .admonition.caution {
  border-color: #ff9100;
}

.admonition.failure, .admonition.missing, .admonition.fail, .admonition.error {
  border-color: #ff5252;
}

.info>.admonition-title::before, .todo>.admonition-title::before {
  background-color: #00b8d4;
  border-radius: 50%;
}

.warning>.admonition-title::before, .attention>.admonition-title::before, .caution>.admonition-title::before {
  background-color: #ff9100;
  border-radius: 50%;
}

.failure>.admonition-title::before,.missing>.admonition-title::before,.fail>.admonition-title::before,.error>.admonition-title::before{
  background-color: #ff5252;;
  border-radius: 50%;
}

.admonition>:last-child {
  margin-bottom: 0 !important;
}
注意:不要在博客主题的_config.yml中设置jsDelivr!
如果想要设置jsDelivr的话,一定要确保jsDelivr的url下的css/my.css中有内容。具体查看方法如下:

目前支持以下类型的提示块,不支持note类型的提示块:
- info、todo
- warning、attention、caution
- failure、missing、fail、error
使用方法:
在markdown中写入符合语法的语句,如下:
!!! Warning "警告信息"
这是一条不带标题的警告信息。
第二句话。
!!! info " "
信息提示
failure
错误提示
严格规范写法:
三个英文感叹号;换行使用shift+回车;正文内容每行前面是四个中文空格;以回车结束这个提示块
效果:
警告信息
这是一条不带标题的警告信息。
第二句话。
信息提示
failure
错误提示
4. 文章 Front-matter
4.1 选项详解
Front-matter 选项中的所有内容均为非必填的。但仍然建议至少填写 title 和 date 的值。
| 配置选项 | 默认值 | 描述 |
|---|---|---|
| title | Markdown 的文件标题 |
文章标题,强烈建议填写此选项 |
| date | 文件创建时的日期时间 | 发布时间,强烈建议填写此选项,且最好保证全局唯一 |
| author | 根 _config.yml中的 author |
文章作者 |
| img | featureImages中的某个值 |
文章特征图,推荐使用图床(腾讯云、七牛云、又拍云等)来做图片的路径.如: http://xxx.com/xxx.jpg |
| top | true |
推荐文章(文章是否置顶),如果 top 值为 true,则会作为首页推荐文章 |
| hide | false |
隐藏文章,如果hide值为true,则文章不会在首页显示 |
| cover | false |
v1.0.2版本新增,表示该文章是否需要加入到首页轮播封面中 |
| coverImg | 无 | v1.0.2版本新增,表示该文章在首页轮播封面需要显示的图片路径,如果没有,则默认使用文章的特色图片 |
| password | 无 | 文章阅读密码,如果要对文章设置阅读验证密码的话,就可以设置 password 的值,该值必须是用 SHA256 加密后的密码,防止被他人识破。前提是在主题的 config.yml 中激活了 verifyPassword 选项 |
| toc | true |
是否开启 TOC,可以针对某篇文章单独关闭 TOC 的功能。前提是在主题的 config.yml 中激活了 toc 选项 |
| mathjax | false |
是否开启数学公式支持 ,本文章是否开启 mathjax,且需要在主题的 _config.yml 文件中也需要开启才行 |
| summary | 无 | 文章摘要,自定义的文章摘要内容,如果这个属性有值,文章卡片摘要就显示这段文字,否则程序会自动截取文章的部分内容作为摘要 |
| categories | 无 | 文章分类,本主题的分类表示宏观上大的分类,只建议一篇文章一个分类 |
| tags | 无 | 文章标签,一篇文章可以多个标签 |
| keywords | 文章标题 | 文章关键字,SEO 时需要 |
| reprintPolicy | cc_by | 文章转载规则, 可以是 cc_by, cc_by_nd, cc_by_sa, cc_by_nc, cc_by_nc_nd, cc_by_nc_sa, cc0, noreprint 或 pay 中的一个 |
注意:
- 如果
img属性不填写的话,文章特色图会根据文章标题的hashcode的值取余,然后选取主题中对应的特色图片,从而达到让所有文章的特色图各有特色。date的值尽量保证每篇文章是唯一的,因为本主题中Gitalk和Gitment识别id是通过date的值来作为唯一标识的。- 如果要对文章设置阅读验证密码的功能,不仅要在 Front-matter 中设置采用了 SHA256 加密的 password 的值,还需要在主题的
_config.yml中激活了配置。有些在线的 SHA256 加密的地址,可供你使用:开源中国在线工具、chahuo、站长工具。- 您可以在文章md文件的 front-matter 中指定 reprintPolicy 来给单个文章配置转载规则
4.2 示例
---
title: typora-vue-theme主题介绍
date: 2018-09-07 09:25:00
author: 赵奇
img: /source/images/xxx.jpg
top: true
hide: false
cover: true
coverImg: /images/1.jpg
password: 8d969eef6ecad3c29a3a629280e686cf0c3f5d5a86aff3ca12020c923adc6c92
toc: false
mathjax: false
summary: 这是你自定义的文章摘要内容,如果这个属性有值,文章卡片摘要就显示这段文字,否则程序会自动截取文章的部分内容作为摘要
categories: Markdown
tags:
  - Typora
  - Markdown
---
5. 文章发布流程
# main分支,网页显示的内容是main分支的
hexo new post 文章名字
hexo g
hexo s

# local分支,用于本地博客文件在GitHub备份
cd ~/myblog
git add .
git commit -m '更新博客本地文件'
git push origin local
其他功能可以自己探索哦(๑•̀ㅂ•́)و✧